Unknown's avatar

About Allen

Lifelong wargamer, professional model maker, owner of GameCraft Miniatures

New GHQ infantry

There is some discussion on the GHQ forums about the infantry they produce being way oversized.  So, I opened up a pack of the latest release from GHQ, it’s #N559; Modern German Infantry.

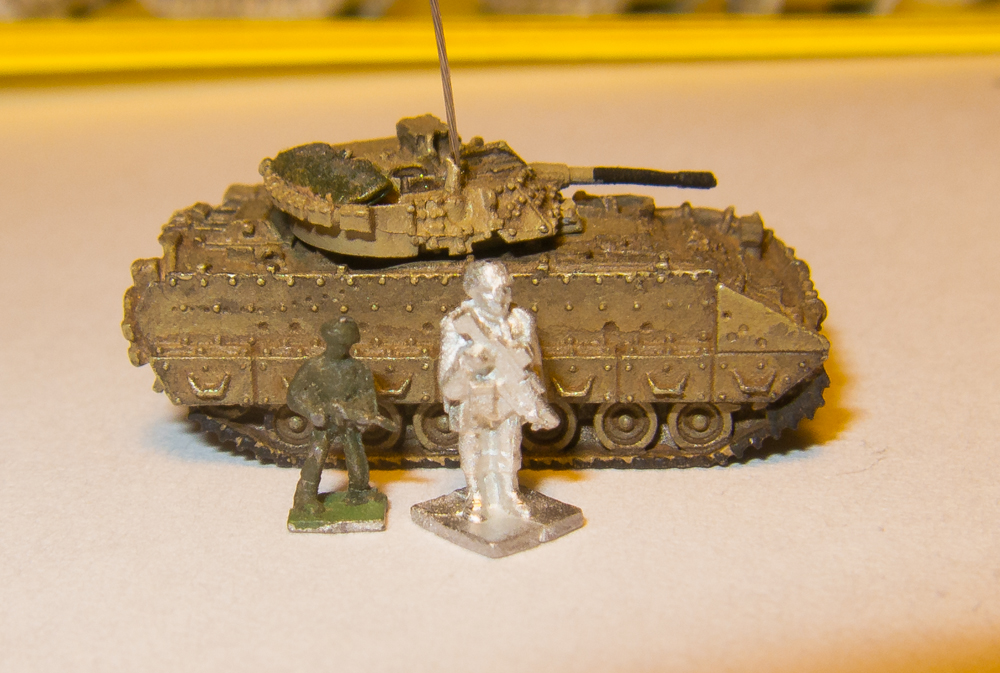
I found one figure that was standing straight up and measured him.  He measured .3275″ tall, subtracting the thickness of the base (.0270″) the actual height of the figure was .3005″  Multiplying that figure by 285 gets you a height of 85.64″ in full scale, that’s 7′ 1.64″ tall.  Not a monster, but very tall.  Standing the figure next to an M2 Bradley (#N547) the top of his helmet is almost as tall as the top of the turret, in reality the top of his helmet should come up almost as high as the top of the hull,,, not the turret.

So, conclusion; These figures are a bit oversize but not grossly oversize.  A 7′ tall human is not unheard of, just very rare.  That being said, I’m not knocking GHQ for this, there is no way I could do any better.  Sculpting something this small and this detailed is no easy task.  So, while they are oversized a bit, I think they look ok as long as you don’t get them too close to a vehicle.

I have some really old (about 30 years) US infantry that measure .250″ tall for a scale height of 5′ 11″ tall … but they are not nearly as detailed as the new stuff.  See second photo.

IMG_2988

IMG_2990

Installing Rare Earth Magnets in Micro Armor

This is a great way to keep your turrets from falling off and still maintaining the ability to rotate the turrets.

Step 1:  Cut off the turret peg

Step 1: Cut off the turret peg

Step 2:  Drill a hole for the magnet.  The hold should be drilled just deep enough so that the drill bit is just starting to drill at it's specified diameter (just beyond the angled tip)

Step 2: Drill a hole for the magnet. The hold should be drilled just deep enough so that the drill bit is just starting to drill at it’s specified diameter (just beyond the angled tip)

Step 3: Glue the magnet in the turret

Step 3: Glue the magnet in the turret

Step 4:  Open up the hole in the hull to the same size at the turret magnet if necessary (in this M1 it was not necessary) and then glue the larger hull magnet inside the hull

Step 4: Open up the hole in the hull to the same size at the turret magnet if necessary (in this M1 it was not necessary) and then glue the larger hull magnet inside the hull

All Done

All Done

More Progress on the USS Wasp Superstructure

Added all the doors, ladders and some vent thingies on the outside of the stacks.  Also began construction of the antenna/radar/sensor towers.

I’m actually beginning to feel like the end of this project is near.  There is virtually no end to the level of detail I can add to this model … but the bottom line is that it’s a gaming piece, not a museum quality model.  There is plenty of detail yet to be applied but I’m not going to go nuts with tiny details that will make the model too fragile to use for it’s intended purpose.

SuperstructureProgress-6 SuperstructureProgress-5 SuperstructureProgress-4 SuperstructureProgress-3 SuperstructureProgress-2 SuperstructureProgress-1

USS Wasp Progress Today

Added some more graphics to the deck (numbers) and worked a bit on the interior bay, finalized the lighting and added a few details to the exterior of the hull.

Really starting to look like something

Really starting to look like something

Adding a few external hull details

Adding a few external hull details

Really starting to come together

Really starting to come together

Lighting finalized and side bumper panels installed

Lighting finalized and side bumper panels installed

Added more graphics to the deck

Added more graphics to the deck

Opps

Quite often when you make a fiberglass mold there will be damage to the master, especially if the master is a bit fragile.  Removing a rigid master from a rigid mold can be a little tricky since neither one likes to bend.  Luckily the bow broke off nice and clean and was a piece of cake to replace again.

The poor girl got a broken nose

The poor girl got a broken nose

Easy repair

Easy repair

Just like new again

Just like new again

USS Wasp Bow Mold Prep

I had intended this USS Wasp to be a one of a kind scratchbuilt model … but a few people nave inquired about commissioning me to build one for them too.  So I decided to make a mold of the bow section to ensure future models were as accurate as this one.

Bow prepped and ready for mold making process

Bow prepped and ready for mold making process

Bow prepped and ready for mold making process

Bow prepped and ready for mold making process

WaspBowMold-1